Showing posts with label guest post. Show all posts

Party Time Salad

birthday
Happy Friday everyone!!  Today, I'm excited to be participating in a virtual birthday party for Meghan over at The Tasty Fork.  She has invited a group of great bloggers to make her some birthday treats and dishes.  My party contribution is an easy Party Time Salad.  This salad is quick to put together and travels well.  It will satisfy the tastebuds of everyone by giving them the option of what to put in their bowl.  So, Meghan, here's to you and a wonderful birthday celebration!!


Ingredients:
2 bags of lettuce
toppings of your liking (my family loves olives, cheese, carrots, egg, celery)
dressings of your choice

Directions:
1.  Place lettuce in a disposable pan or 9x13 inch pan.
2.  Add toppings of your choice.
3.  Cover and take with you to your gathering or party.
4.  Serve with dressings of your choice.


This post is linked up to THESE GREAT PARTIES!!!! 

Please stop on over to say hi on Facebook, Pinterest, or Twitter.  
Thanks ~ Nichi

Strawberry Fruit Fluff


This fruit salad is a long-time favorite in my family.  We eat it as a side dish, dessert, and even breakfast.  It is a simple and easy to make dish that will delight the whole family.  Take it to your next family gathering and have them devour it within minutes.

Ingredients:
1 large can of pears, drained and diced OR 1 pint of strawberries, diced
1 (16 oz.) container of small curd cottage cheese
1 pkg. strawberry flavored dry gelatin mix
1 (16 oz.) container of whipped topping
Toppings:  sprinkles, nuts, etc...

Directions:
1.  Combine the pears in a large bowl with the cottage cheese.
2.  Add the dry gelatin mix and stir until well blended.
3.  Fold in the whipped topping and refrigerate for at least one hour.
4.  Feel free to top with sprinkles, nuts, or leave plain.


This post is linked up to THESE GREAT PARTIES!!!! 

Please stop on over to say hi on Facebook, Pinterest, or Twitter.  
Thanks ~ Nichi

Blooming Oreo Dessert


My dear grandma passed away 2 years ago.  Not a day goes by that I don't think about her.  This was one of her recipes that she always made for family gatherings.  She was an amazing cook and wonderful person.  I only hope to be half the person that she was.  I have included her 9x13"pan version and my fun potted version for you to enjoy.

9x13" pan version:
1 pkg Oreo cookies, crushed      
1/2 c. butter, melted      
1 pkg. instant vanilla pudding
2 c. milk
8 oz. cream cheese, softened      
1 c. powdered sugar
1 carton Cool Whip

Mix Oreos and butter.  Press all but 1/2 cup into bottom of 9x13” pan with fork to form crust.  Combine cream cheese, powdered sugar, and ½ of Cool Whip, pour into pan over Oreo crust.  Combine pudding and milk, pour over cheese mixture.  Refrigerate for 15 minutes.  Cover with remaining Cool Whip.  Sprinkle with remaining crushed Oreos.  Refrigerate until served.

9 flower pots version:
Mix ingredients as noted above in pan version, leaving out the butter.  Layer into plastic pots evenly in this order - Oreos, cream cheese mixture, Cool Whip, pudding, more Cool Whip, Oreos.  Top with fake flowers for decoration.
**  found the plastic flower pots years ago at Walmart

This post is linked up to THESE GREAT PARTIES!!!! 

Please stop on over to say hi on Facebook and Pinterest

Thanks ~ Nichi


The Hoo Rag - a product review

Have you ever heard of the Hoo Rag?  I was lucky enough to receive one in the mail to review.  What a great product with so many versatile uses.  It is a seamless bandana that comes in a variety of colors and styles.  You can pick the one that best suits you.  My daughter loves the one that we got.  This is her favorite way to wear it....keeps her hair out of her face while cooking.  So fun!! 


Here are the many other ways to wear the Hoo Rag.  So what are you waiting for?  Go order one (or more) for yourself!!!!


PONY TAIL RAG

If you want to keep your hair out of your face, and not look like a tiny Chewbacca, try Pony Tail Rag style.  Use your Hoo Rag to tie up your hair, and rest assured that you are rocking the sweetest possible pony tail accessory on the market, and do not resemble a Wookie.

FACE RAG

Perfect for desert journeys, ranching, and paintball, Face Rag style boasts extreme versatility and protection.  Cover your mouth and nose with your Hoo Rag to prevent dust, dirt, and non-toxic paint from getting into your lungs.

ALICE RAG

Who needs a beret when you can simply wear Alice Rag style with the design and style of your choice.  Wrap your favorite Hoo Rag around your hair to keep it up and out of your face, all while lending to your air of mystery and sensuality.

BALACLAVA RAG

For maximum protection from the sun, or maximum anonymity, Balaclava Rag style takes care of business.  Cover your entire face except for your eyes and achieve complete Hoo Rag ninja status, a new breed of ninja that wears sunglasses.

HEAD BAND RAG

Nothing says sweetness more than rocking Head Band Rag style with your favorite design.  Wrap the Hoo Rag around your forehead to keep hair and sweat out of your eyes, and make yourself look like John McEnroe.  Which is awesome.

NECK RAG

Sure to drive the boys crazy ladies, is the classy and sassy Neck Rag style.  Wrap your stylish Hoo Rag around your neck to draw some attention, and immediately transform into a cowgirl or Daphne from Scooby Doo.

PIRATE RAG

There’s a little bit of “Arrrr Matey” in all of us, which is why you rock Pirate Rag style.  Pillage and plunder in a friendly and responsible way by wrapping your Hoo Rag completely around the top of your head, and covering your skull.

THE NECK WARMER

Perfect for partying outside on cold nights, or when shredding on the slopes, The Neck Warmer style is the perfect way to look stylish while keeping your neck and throat warm.  No one likes having a frozen neck, we feel your pain.

Pass the Plate program - Chocolate Macadamia Lacey Cookies

Earlier this month I was lucky enough to receive a box of these amazing Chocolate Macadamia Lacey Cookies from my sweet blogger friend, Sharon at Lilikoi Joy.  It was part of the Bebetsy's Pass the Plate project through Kitchenaid's Cook for the Cure® program.  Joining passionate cooks to support the fight against breast cancer.  I'm now on the search for one dear blogger friend to recieve a sweet plate of treats from me in the mail and will post about it.  Until then, enjoy THIS amazing recipe from Sharon and tell her I sent you!!


A little more about the program:
BeBetsy was inspired by Kitchenaid's Cook for the Cure® program to support the fight against breast cancer through culinary fundraising with programs like this one. The plate is a beautiful 2012 plate designed and signed by famous French chef Jacque Pepin. Each time the plate is passed on from one foodie to another (it gets registered), Kitchenaid makes a donation to the Susan G. Komen for the Cure®.  This program is dear to my heart for many reasons but recently a family member was diagnosed and treated for breast cancer.  So, if you are interested in being a part of this cause please let me know.  I would love to pass on the plate to you with some tasty treats.

I was so excited to get this package of treats from Sharon.  My kids and I dove into them as soon as we got home.  Oh my goodness,  They were delicious!!  Thanks again, Sharon!!
The cookies were packed well.  Look at the sweet heart shaped one in the center of the container.  What a fun touch.  I served them on the plate that says "cook for the cure".  What a fun program...and all for a good cause.

Guest Post - Doc's Favorite Meatloaf from Lorraine at Cookin' for the Seven Dwarfs

Hi friends of Mandatory Mooch! I'm Lorraine from Cookin' For the Seven Dwarfs. I'm so excited I got the chance to Guest Post here! I started my blog last November, so I'm pretty new to the blogging world. I have 7 guys in my life that I love to cook for--my 6 brothers (I'm the only sister) and my dad! This was a way for me to keep track of recipes they love, and they're comments on each recipe!

The recipe I'm sharing with you today is one of the Dwarfs favorites -- Meatloaf! I've tried making other meatloaf recipes for the Dwarfs, but this is always their favorite, so I've stopped trying to come up with new ways to make it! :)


Doc's Favorite Meatloaf

2lbs ground beef
1 small chopped onion
2 eggs
1 pkg crushed saltines
1 can tomato sauce
season salt, pepper and garlic
2 Tbls. Worcestershire sauce
1/2 can cream of mushroom soup

Combine all ingredients expect cream of mushroom soup. Form into loaf and cover completely with soup. Bake for 1 hour and 15 minutes.


I'd love for you come visit me at Cookin' For the Seven Dwarfs  or you can find me on Facebook or Pinterest!

Thank you so much for having me, Nichi!

Guest Post - Angel Food Jello Dessert from Jo and Sue


Angel Food Jello Dessert

Sue and I are excited to be sharing this light and tasty dessert with Nichi’s readers here at The Mandatory Mooch. Sue and I started our blog, http://joandsue.blogspot.ca/, about a year and a half ago and not long after we stumbled upon The Mandatory Mooch’s Tasty Thursday’s Link Party. We have been following ever since.


When Nichi said she was looking for bloggers to guest post on her blog, we jumped at the opportunity. Sue and I are twins in a small Canadian town located in the mountains. Our blog is a chance for us to share our favorite recipes and stories. We hope you will stop by and say hi.


For now though, we wanted to share a recipe that is fairly easy to make, looks impressive, and tastes super yummy. We decided to put a twist on the classic combination of cake, Jello, and whipped cream by putting them all together in a fancy schmancy cake.


Angel Food Jello Dessert

Ingredients
Cake
 

1 box Angel Food Cake + ingredients to make cake as listed on box
¼ to 1/3 cup icing sugar

Filling
1 Tbsp gelatin
1 cup pineapple juice
¼ cup water
1 ½ cups whipping cream
1 tsp vanilla
2 cups Jello, different colors, cubed

Topping
1 cup whipping cream
1 tsp vanilla
1 Tbsp sugar

Directions
Preheat oven to 350. Line a 15 X 10 cookie sheet/jelly roll pan with parchment paper, set aside.
Prepare Angel Food Cake as per box instructions. Spread evenly in prepared pan. Bake at 350 for 15 - 20 minutes, until cake is evenly browned.


Remove from oven and let cool about 10 minutes. Run a knife gently around the edge of the pan. Place a large, clean tea towel on a flat surface. Sift the icing sugar over the towel to cover evenly. Gently flip Angel Food Cake onto the sugar covered tea towel.


Let cake cool completely.
Place an 8 inch spring form pan gently on top of the corner of the cake when it is cool. Run a serrated knife around the pan to cut out the cake to fit the pan.


Place the circle of cake, browned side down, into the bottom of the spring form pan. Measure how far it is from the top of the cake in the pan to the top of the sides of the pan. Cut a strip of Angel Food Cake that wide to fit around the inside of the spring form pan, browned side in. (You may need to cut a little piece to complete the circle)


Cover the cake so it doesn’t dry out and set aside while you make the filling.
In a medium saucepan, sprinkle gelatin over pineapple juice. Let sit 5 minutes. Place over medium heat and heat until gelatin is dissolved and mixture is smooth.
Remove from heat and add the water. Transfer to a bowl and let cool slightly - chill about 10 - 15 minutes in the fridge so it is cold but not set.
Whip the cream and vanilla until stiff peaks form. Whisk the pineapple juice mixture into the cream.
Sprinkle the Jello cubes into the cream/pineapple juice mixture and very gently stir them in.
Pour the mixture into your spring form pan.


You can see from the above photo I used 2 smaller spring form pans. I couldn’t find my large one. Eeep! It’s okay, this will work in 1 large or 2 smaller.  Now, just chill, covered, in the fridge until it is completely set up. I have always left it overnight for good measure. When ready to serve simply whip your remaining 1 cup of cream with vanilla and sugar until stiff peaks form and spread over the top of the dessert. If desired, you can sprinkle a few sprinkles on top to add some more color.
Slice and serve. 


We hope you enjoy this dreamy Jello and Angel Food Cake dessert. We would love for you to stop by http://joandsue.blogspot.ca/ and tell us what you think.  Sue and I would like to thank Nichi for the opportunity to share with her amazing readers!

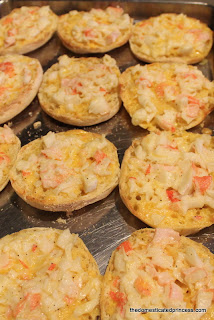
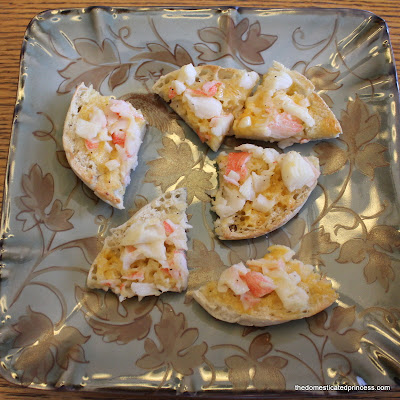
Guest Post - Crab and Cheese Triangles by Bonny from The Domesticated Princess

Hello! My name is Bonny, and I'm the Domesticated Princess! I'm a former English teacher who has been blessed by becoming a stay-at-home-mom who, with three school-aged sons involved in sports and scouts along with a precious two-year-old daughter, rarely seems to stay at home for long. I'm so excited about guest posting today on The Mandatory Mooch and hope you'll enjoy my recipe enough to check out my blog where you'll find plenty of other recipes along with tutorials for crafts, sewing, and projects. Today, I will be sharing with you one of my all-time favorite appetizers: Crab and Cheese Triangles! 
One of the benefits of sharing your best recipes with friends is that if you happen to misplace your recipe, it's always just a phone call away. That's what happened to this particular recipe once I decided to share it with all of you. I had already purchased the ingredients because I have that part memorized, but when I got home to pull out my recipe card, I couldn't find it anywhere. It had simply vanished. I panicked for a moment because this is such a delicious recipe that the thought of having to figure out the proportions correctly seemed daunting, but then I remembered I had shared this recipe with my BFF years ago. In fact, she and I have most of each other's favorite recipes, which has come in handy more than just on this occasion.  I've had this recipe almost as long as I've known my best friend. While she and I go back to our early high school years, I got this recipe from a college room mate our junior year. I don't know where my room mate found this recipe, but it became our staple at wedding showers and football parties because everyone loved it. We tweaked it a little bit at the beginning, but the end result is something that almost 20 years later, my friends and guests still love.

With NFL playoff games beginning, I know there will be a lot of football parties going on over the next month, so I wanted to share something that has always been a hit among both men and women. Like I said, we've used this one not only while hosting Superbowl games in college but also for wedding and baby showers. It's just that versatile and that yummy, so if you have a party you are hosting or if you've been asked to bring along party food, give this recipe a try. I promise; it'll be a huge hit! Just don't ask me how many calories are in it. With a whole stick of butter, we just don't need to know!  


Crab & Cheese Triangles

Ingredients:
5 oz Old English Sharp Cheddar Cheese spread
1 stick margarine
1/2 Tbsp mayonnaise  
1/4 tsp salt
1/8 tsp pepper
1/2 tsp garlic powder
7 oz. fake crab meat  
6 English muffins


Steps:  
1. Preheat oven on high broil.  
2. Melt margarine (I put my stick in the glass mixing bowl I use and set it on defrost on my microwave for one minute.). Mix with cheese spread and mayo.  


3. Season with salt, pepper, and garlic powder.  
4. Chop up crab meat and stir into mixture.  
5. Cut open muffins and spread mixture on top of all 12 slices. I've discovered that using an ice cream/cookie dough scoop works very well at ensuring an equal amount per muffin.  


6. Place on cookie sheet and broil for 12-14 minutes on middle rack.   
 
7. Cut each muffin into fourths and serve. If you have a pizza cutter, those work perfectly to quarter up your muffins. 

 
Yields 48 pieces (which serves 8-10 guests)

So, do you have any occasions where you'll want to make these Crab and Cheese Triangles? If so, I'd love to hear about them.  Just swing by TheDomesticatedPrincess.com and let me know. While you are there, you can learn how to create a Weekly Menu Planning Board and check out all my easy weeknight favorite recipes. Thank you again, Nichi, for allowing me the opportunity to meet all your lovely readers! 
  

Guest Post - Divinity Kisses By Wanda from Memories By The Mile

I am so happy to be here at Mandatory Mooch.

With Valentine's just around the corner

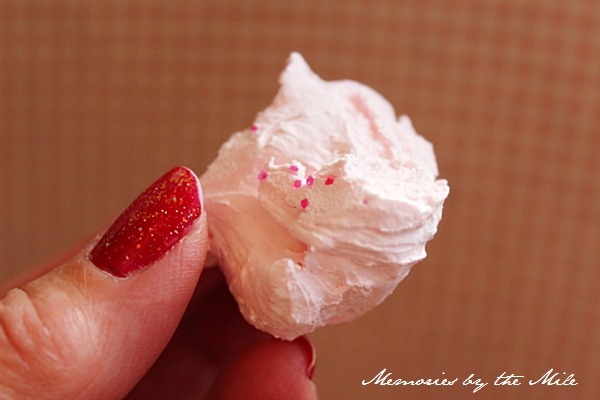
I thought I share these cute little Divinity Kisses.
IMG_4694

My name is Wanda Ann from Memories by the Mile. If you haven’t heard of me, let me share just a little of what my blog is about. My husband and I have a semi  that we drive together all over this beautiful country and I am sharing about the places we see, the people we meet and the recipes we love. So I hope you’ll come by and check it out.
IMG_2623wm

Today I am sharing with you a recipe
that my mom has made for as long as I can remember.
These little 
Divinity Kisses
 just melt in your mouth like cotton candy.
So let’s get started:

Divinity Kisses


Ingredients
2 1/2 cups sugar
1/2 cups Karo light corn syrup
1/2 cup water
dash of salt
2 egg whites
1 teas. vanilla
red food coloring
sprinkles
Divinity 1
Stir and bring to boil, let cook on medium heat to soft ball stage 230*
While that is cooking in mixer beat egg whites to nice peaks. Then pour 3/4 of the syrup slowly into egg white while beating. Let the other 1/4 cup another 30 to 40 seconds and then add it, all the while keeping the mixer going. When it starts to set up, you will notice that it looses its shine, then immediately add the vanilla and a few drops of food coloring. Quickly using two spoons drop on wax paper to form little kisses and add sprinkles.
Divinity 2
IMG_4697
IMG_4690

Give these little kisses a try and see how many hugs you get! 

I would love for you to stop by and visit me at Memories by the Mile
You can keep up with me via twitter, pinterest, google+ and/or facebook.

Nichi thank you so much for having me.


Last Guest - Guest Post Spectacular - Susie from Bowdabra


{Handmade Christmas Gifts} Snowman Soup


Do you enjoy making handmade Christmas gifts? How about receiving them? I personally love to make and to receive handmade gifts at Christmas and anytime of the year. If I let time slip away I can easily find myself scrambling to put together gifts for people. One of my favorite quick fix craft gifts every year is Snowman Soup. We even call our homemade hot cocoa mix, Snowman Soup. Below is the recipe for my homemade hot cocoa mix. For this craft, you can purchase a premade mix or make a large batch of my mix and you’ll always have it on hand to whip up quick gifts.


Snowman Soup Hot Cocoa Mix
Ingredients:
1 large container of powdered creamer
1 large container of Nestle’s Quik powder mix
1 lb powdered sugar
1 small box of powered milk
1 teaspoon cinnamon or nutmeg
Mix all ingredients together in a large bowl or jar with a lid.
To serve: Grab your favorite mug and use 1/4-1/2 cup of this mixture with 1 cup of hot water.
Top your cocoa with whipped topping, cocoa powder, cinnamon, nutmeg or powdered sugar. Cinnamon sticks, peppermint sticks, mini marshmallows and Hershey Kisses are wonderful additions to this drink and create “Snowman Soup.”

Snowman Soup Gift Tag 
Materials Needed:
  • Snowman Soup label (feel free to copy the below label into your word program and print it off)
  • holiday craft papers
  • double sided tape
  • stickers, stamps and other holiday embellishments
  • hole punch
  • mini marshmallows
  • Hershey Kisses
  • Cellophane gift bag or Wilton clear frosting bag
  • Mini Bowdabra
  • Bowdabra Bow Wire
  • Various Christmas Ribbons
  • More Christmas Ribbons
Instructions:
Hand write or print off the below saying.

Snowman Soup
Was told you’ve been real good this year.
Always glad to hear it!
With freezing weather drawing near,
You’ll need to warm the spirit.
So here’s a little Snowman Soup
Complete with stirring stick.
Add hot water, sip it slow.
It’s sure to do the trick!

1. Cut it to size and layer it on fun holiday papers, securing with a tape runner. Add a snowman sticker or stamp.


2.  Cut 24″ of Bowdabra Bow Wire and fold it and place it into the Mini Bowdabra. Take 18″ of a holiday ribbon and add 3″ into the Mini Bowdabra, pattern side up.


3. Continue to loop the ribbon back and forth in the Mini Bowdabra. Twist at the center to keep the pattern facing upward.


4. Once all the ribbon is in the Mini Bowdabra, squish down the ribbon with the Mini Bowdabra wand. Pull up the Bowdabra Wire and string on a jingle bell.  Pull up the Bowdabra Wire and tie off the bow. Don’t cut off the extra wire.


6. Add 15 mini marshmallows, 3/4 cup of Snowman Soup Hot Cocoa mix, 3 Hershey Kisses to a cellophane gift bag or a clear frosting piping bag.


7. Tie bow around the Snowman Soup, add candy cane, hole punch tag and tie it to the bag with the extra Bowdabra Wire.


Our links Bowdabra blogBowdabra PinterestSandy Sandler PinterestBowdabra Twitter, and Bowdabra Facebook sites as well as our Ribbons & Things Store and Crafters4Kids Nonprofit organization.

We have Bowdabra Designers who create projects for Bowdabra. The Snowman Soup was created by designer, Susie from SusieQTpies Scraps of Life.