Showing posts with label Guest Post Spectacular. Show all posts

Last Guest - Guest Post Spectacular - Susie from Bowdabra


{Handmade Christmas Gifts} Snowman Soup


Do you enjoy making handmade Christmas gifts? How about receiving them? I personally love to make and to receive handmade gifts at Christmas and anytime of the year. If I let time slip away I can easily find myself scrambling to put together gifts for people. One of my favorite quick fix craft gifts every year is Snowman Soup. We even call our homemade hot cocoa mix, Snowman Soup. Below is the recipe for my homemade hot cocoa mix. For this craft, you can purchase a premade mix or make a large batch of my mix and you’ll always have it on hand to whip up quick gifts.


Snowman Soup Hot Cocoa Mix
Ingredients:
1 large container of powdered creamer
1 large container of Nestle’s Quik powder mix
1 lb powdered sugar
1 small box of powered milk
1 teaspoon cinnamon or nutmeg
Mix all ingredients together in a large bowl or jar with a lid.
To serve: Grab your favorite mug and use 1/4-1/2 cup of this mixture with 1 cup of hot water.
Top your cocoa with whipped topping, cocoa powder, cinnamon, nutmeg or powdered sugar. Cinnamon sticks, peppermint sticks, mini marshmallows and Hershey Kisses are wonderful additions to this drink and create “Snowman Soup.”

Snowman Soup Gift Tag 
Materials Needed:
  • Snowman Soup label (feel free to copy the below label into your word program and print it off)
  • holiday craft papers
  • double sided tape
  • stickers, stamps and other holiday embellishments
  • hole punch
  • mini marshmallows
  • Hershey Kisses
  • Cellophane gift bag or Wilton clear frosting bag
  • Mini Bowdabra
  • Bowdabra Bow Wire
  • Various Christmas Ribbons
  • More Christmas Ribbons
Instructions:
Hand write or print off the below saying.

Snowman Soup
Was told you’ve been real good this year.
Always glad to hear it!
With freezing weather drawing near,
You’ll need to warm the spirit.
So here’s a little Snowman Soup
Complete with stirring stick.
Add hot water, sip it slow.
It’s sure to do the trick!

1. Cut it to size and layer it on fun holiday papers, securing with a tape runner. Add a snowman sticker or stamp.


2.  Cut 24″ of Bowdabra Bow Wire and fold it and place it into the Mini Bowdabra. Take 18″ of a holiday ribbon and add 3″ into the Mini Bowdabra, pattern side up.


3. Continue to loop the ribbon back and forth in the Mini Bowdabra. Twist at the center to keep the pattern facing upward.


4. Once all the ribbon is in the Mini Bowdabra, squish down the ribbon with the Mini Bowdabra wand. Pull up the Bowdabra Wire and string on a jingle bell.  Pull up the Bowdabra Wire and tie off the bow. Don’t cut off the extra wire.


6. Add 15 mini marshmallows, 3/4 cup of Snowman Soup Hot Cocoa mix, 3 Hershey Kisses to a cellophane gift bag or a clear frosting piping bag.


7. Tie bow around the Snowman Soup, add candy cane, hole punch tag and tie it to the bag with the extra Bowdabra Wire.


Our links Bowdabra blogBowdabra PinterestSandy Sandler PinterestBowdabra Twitter, and Bowdabra Facebook sites as well as our Ribbons & Things Store and Crafters4Kids Nonprofit organization.

We have Bowdabra Designers who create projects for Bowdabra. The Snowman Soup was created by designer, Susie from SusieQTpies Scraps of Life.

Guest #11 - Guest Post Spectacular - Sheena from Hot Eats and Cool Reads


Hi everyone! I'm Sheena, and I blog over at Hot Eats and Cool Reads. I have a spunky 5 year old daughter who keeps me busy when I'm not at work, and in my spare time I love to try new recipes and blog about them. Reading is also a hobby, so you'll find book reviews on the blog too. 

We are huge soup lovers at our house, so I'm always on the look out for some new soup inspirations. This one was made up of some ingredients I had on hand, and the inspiration from a soup I made when I first started blogging. I love the tomatoes, beans and pasta in this soup. There is so much flavor and it warms you right up! It's wonderful for a cold winter day and we've had a few of those in Minnesota lately! Brrr!

Thanks so much to Nichi for letting me share today and I hope you enjoy this soup as much as we did!


Sausage and White Bean Soup

What you need:
1 pound sausage of your choice, I used pork
1 teaspoon Italian seasoning
2 cloves garlic, minced
1/2 cup onion, diced
1 cup shredded carrot
7 cups chicken broth
1- 15 ounce can diced tomatoes
1- 15 ounce can cannellini beans, rinsed and drained
1 cup small pasta
salt and pepper

Directions:
In a soup pot, brown sausage, garlic, and onion seasoned with the Italian seasoning and salt and pepper until sausage is no longer pink. Add carrots, and saute for another 2-3 minutes. Pour in the chicken broth, tomatoes, and beans. Bring to a boil and add pasta. Reduce heat and simmer until pasta is al dente, about 10 minutes, depending on which pasta you use. Add salt and pepper as desired.

Come visit me at Hot Eats and Cool Reads, Facebook, Pinterest, Twitter or Google+!

Guest #10 - Guest Post Spectacular - Evelyn from My Turn for us


Hello Everyone! 
 I'm Evelyn and I share over at My Turn for us
 My Turn For Us
 My sweet Fellow and I are newly retired from Law Enforcement and are 
in the process of obtaining the dream of traveling full time in an RV. 
 I started this blog to share my adventures with my family and friends then this 
little blog just took a life of it's own and I am just enjoying watching it grow.

 I named it for this time in my life that after years of raising three awesome kids and holding down a full time job now it is "My Turn for us" to be selfish with our days.  We have five awesome grandbabies so we do share our time making sure they have the grandparents they deserve.   

 I love to cook and travel and seeing this great country that we live in!   
  
I am so happy to be guest posting here at Mandatory Mooch.   
I wish to thank Nichi for the honor of being asked. 

My Fellow and I have both grown up on the Southwestern Border of the United States so about every third meal is Mexican Food.  Today I am sharing Albondigas (meatball soup with veggies)


Albondigas


Ingredients:

1 /2 lbs of ground Turkey Breast
5 links of sweet Italian sausage
(healthy choices:)
1 cup rice
1 egg, scrambled
1 tsp sea salt
2 tbsp of chopped dehydrated onion
1 tsp cumin
1 tsp black pepper
2 tsp granulated garlic
1 tsp oregano
1cup fresh cilantro, very finely chopped
1 carrot, shredded
1 zucchini, roughly chopped
1 carrot, roughly chopped
2 ribs of celery, roughly chopped
1/4 head of green cabbage, roughly chopped
32 oz Chicken Stock
4 cups of water

Additional seasons will be added later

Directions:

Soak the rice for 30 minutes in just enough water to cover the rice


Place the ground turkey in a large bowl, 
remove the casing from the sausages and add to the turkey.  Add sea salt, onion, cumin, black pepper, garlic, oregano and finely chopped cilantro.  Add the shredded carrot and the scrambled egg. 


Drain rice, add to the meat mixture and mix very well. Form into large meatballs about 1 1/2inches in diameter. (I use my favorite tool in my kitchen, my hands:)


Pour the chicken stock into a large stock pot and add the water.  Bring to a rolling boil.   Gently drop the meatballs into the stock. (very carefully and do NOT stir or your meatballs will break apart).
Cook for 10-15 minutes until the meatballs start to float by coming to the surface.


 Add the chopped carrot, zucchini, celery and cabbage.  Add 1tsp cumin, 1 tsp oregano, 2 tsp of black pepper and 1 tbsp of garlic. Very gently stir to combine. Cover and simmer on low for 30-45 minutes. 


Oh yes!!  Comfort foodies:)


Serve with crunchy bread and enjoy:)


For some of my other favorite Mexican dishes
please try my Gorditas,  Baja Fish Tacos and Chile Relleno Casserole .
  I want to thank Nichi so very much for being a super great host:)


Guest #9 - Guest Post Spectacular - Posed Perfection

Hello, friends of the Mandatory Mooch! I am so excited to be guest posting today. I have been a fan of Nichi's blog for quite a while and I was thrilled when she asked me to share a fun craft with you, her sweet readers.
My name is Nici (pronounced like Nikki) and you can find me over at Posed Perfection. I'm married to Mr. Perfect for Me and I am a homeschooling mom to two great kids. At Posed Perfection, I share simple, delicious recipes, easy-to-duplicate craft projects and whatever is on my heart for the day. I hope you'll stop by for a visit real soon!

Have you finished all your Christmas shopping yet? Or are you like me, and haven't even started? There is still time to make some fun gifts for those special people on your list. While perusing a past issue of Family Circle magazine, I found this simple and fun art project.  This Modern Botanical Bloom Print was a cinch to make and would look great with Christmas inspired artwork as well.
Here's what you need to make this little botanical bloom print:

printed botanical picture
picture frame
glass from the frame
white paint pens (both fine and extra fine for more details)
colored paper or fabric for background
Begin by placing your botanical print on a flat surface. Next, line up the frame's glass over the print and start tracing the image directly onto the glass with your fine tip paint pen.   
Continue tracing until the details you want included are complete. (Yikes! Someone needs a manicure.) Allow to dry for 10-15 minutes. If there are finer details you want to highlight, use your extra fine paint pen to do so.  Keep in mind that this does not need to be a perfect match to the original.  Allow your print to dry completely. Note:  if there are words you want to include, you'll want to print the picture in a mirror image.
When your masterpiece is dry, place it in the frame with the painted side facing to the back. Put your piece of colored paper or fabric into the frame and then the backing. Turn it around and admire.  Ta-da!
This craft could be repeated for just about any genre of artwork.  Trace several different pictures and back them with vibrant colors for a whimsical wall arrangement. It's the perfect craft to make with all those thrifted picture frames you've got in your closet. ;-) Wouldn't this would make a great personalized gift for someone on your list?

For more easy crafts or some family-friendly recipes, come on over and check out my little spot in the blogosphere. I'd be delighted if you visited me :  Posed Perfection , Twitter, Facebook, and Pinterest.

Thank you, Nichi, for inviting me to share this craft with your awesome readers. I am honored that you included me in your Guest Post Spectacular this month.


Guest #8 - Guest Post Spectacular - Lemon Sugar (a talented friend of mine)

Hi everyone! My name is Erin. I'm a working Mom of two sassy little girls and married to my childhood sweetheart. My job and my family keep my pretty busy, but in my down time I like to spend time baking, cooking, dabbling in photography and, of course, blogging! You can find my little piece of the web over at Lemon Sugar - please come by and say hi!

A big thanks to Nichi for inviting me to guest post today - I should tell you that Nichi and I are friends in "real-life" thanks to our husbands who have worked together for many years. Nichi and I are both relatively new to blogging and have bounced many ideas off of each other and I tell you what - her treats are amazing! Thanks again, Nichi!

Today I'm reviving a favorite of mine for you - these cupcakes not only taste AMAZING, but they're beautiful, too! They would work perfectly with any holiday dessert table, and they'd make a fabulous homemade gift, but they're really easy enough to make just because.

That's really the best reason to bake . Just because.

So, get your butter out and let it soften, and make these soon! Please stop by and visit me at Lemon Sugar, and make sure you follow along on Facebook, Twitter, Instagram and Pinterest for lots of behind-the-blog action.

Here's hoping you all have a joyous holiday season, and a new year full of sweets, treats & comfort food.

♥Erin
White Chocolate & Vanilla Bean Cupcakes
Yield: 24 standard cupcakes
Prep Time: 30 minutes ♦ Bake Time: 20 minutes ♦ Total Time: 1 hour 15 minutes

Cupcake Ingredients:
1 cup (2 sticks/16 Tbs) unsalted butter at room temperature
1 and 1/3 cup sugar 6 large eggs, room temperature
2 teaspoons vanilla extract
Seeds from 2 small or 1 large vanilla bean
Zest of 1 large lemon (I omitted this)
3 cups all purpose flour
3 teaspoons baking powder
1/2 teaspoon salt
1/2 cup milk

Preheat oven to 350 degrees F. Prepare cupcake tins with liners.

In the bowl of your stand mixer, beat butter and sugar until pale in color and fluffy, about 5 minutes. Add the eggs one at a time, beating well after each addition. Add vanilla bean and vanilla extract.

In a separate bowl, whisk together lemon zest (if using), four, baking powder and salt. Measure out milk and set aside.

Add 1/3 of the flour mixture to the batter, and beat just until combined. Add half of the milk and beat until combined. Add half of the remaining flour, beat to combine. Add the rest of the milk. Beat to combine, and add the rest of the flour. Beat to combine. During the process, scrape the bowl as needed.

Fill cupcake papers 1/2 to 2/3 full, and bake 17-20 minutes or until cake tester comes out clean. Don’t overbake.

Cool on a wire rack for 2 minutes, then remove from pan and cool completely before frosting. Prepare cupcakes for filling using the cone method.

White Chocolate Creme Filling Ingredients:
3.5 oz marshmallow cream
3 Tablespoons unsalted butter, at room temperature
2 Tablespoons vanilla
1 oz melted white chocolate
2 Tablespoons heavy cream

Melt chocolate in a double boiler or in microwave, then cool slightly. Combine all ingredients in a medium bowl, and beat until smooth and fluffy. Spoon about a teaspoon of filling into each cupcake, then replace the cone. Prepare frosting.

White Chocolate Buttercream Ingredients:
2 sticks unsalted butter, soft but still cool
1 stick salted butter, soft but cool
3 cups powdered sugar
3 Tablespoons heavy cream
2 Tablespoons vanilla
4 oz melted white chocolate, cooled

Melt white chocolate and set aside to cool. In the bowl of a stand mixer using the paddle attachment, beat butter until smooth and fluffy. Add powdered sugar, vanilla and melted chocolate. Beat until completely combined, then add heavy cream. Beat until light and fluffy, about 5 minutes.Frost cupcakes as desired. Garnish with shaved white chocolate.
Recipe Inspiration and Sources: Cupcakes from Joy of Baking, Frosting and Filling from Lemon Sugar

Guest Post Spectacular - Guest #7 - This Gal Cooks

Hello fellow foodies! I'm Julie from This Gal Cooks. I blog about food! I bet the name didn't give it away, did it? I am excited to be here today on The Mandatory Mooch sharing one of my tasty recipes! Today I will be sharing a cinnamon roll cake recipe that I made a while back. This recipe combines ingredients that result in ooey gooey goodness! You can't go wrong with this cake. In fact, it would be perfect to begin your Christmas morning with. Just double the recipe if you are baking for a large group because this recipe serves 6. I hope you enjoy my recipe!


Ingredients

For the cake mix
  • 1 1/2 C All Purpose Flour
  • 1/2 tsp salt
  • 1/2 C white sugar
  • 2 tsp baking powder
  • 3/4 C milk
  • 1 egg
  • 1 tsp vanilla extract
  • 1/4 C butter, melted
For the Cinnamon Sugar Topping
  • 1/2 C butter, room temp
  • 1/2 C packed brown sugar
  • 1 tbsp all purpose flour
  • 1/2 tbsp cinnamon
For the Glaze
  • 1 C powdered sugar
  • 2.5 tbsp milk
  • 1/2 tsp vanilla
Directions
  • In a mixing bowl, combine the flour, salt, white sugar, baking powder, milk, egg and vanilla.
  • Stir in the melted butter.
  • In another mixing bowl, combine the ingredients for the cinnamon sugar topping.
  • Pour the cake mix into a greased 8x8 baking dish. Drop the cinnamon sugar topping into small drops on the top of the cake. Swirl with a knife.
  • Bake at 350 for 25-27 minutes or until a toothpick inserted into the center comes out clean.
  • While the cake is baking, prepare the glaze. Whisk together the glaze ingredients in a mixing bowl.  
  • When the cake is done baking, poke holes into it with a toothpick (I used a large skewer so the holes would be a little bigger than a regular toothpick hole)
  • Pour the glaze over the cake.
  • Allow to cool for about 10 minutes before serving.
A little about the cook:
I'm a foodie who loves to cook and bake. I dream of one day owning my own cafe or bake shop. To find out what other tasty recipes I'm cooking, head over to my blog and have a look around. :)

Guest Post Spectacular - Guest #6 - Call Me PMc

Photobucket
Hello Friends, I'm Paula, but my friends call me PMc. I blog at Call Me PMc about easy to prepare recipes for busy families, time management and workout tips, and easy crafts and DIY projects.
TheGrovea
This is my sweet family. They keep me busy. They make me laugh. They drive me crazy at times! I share it all with you at Call Me PMc.
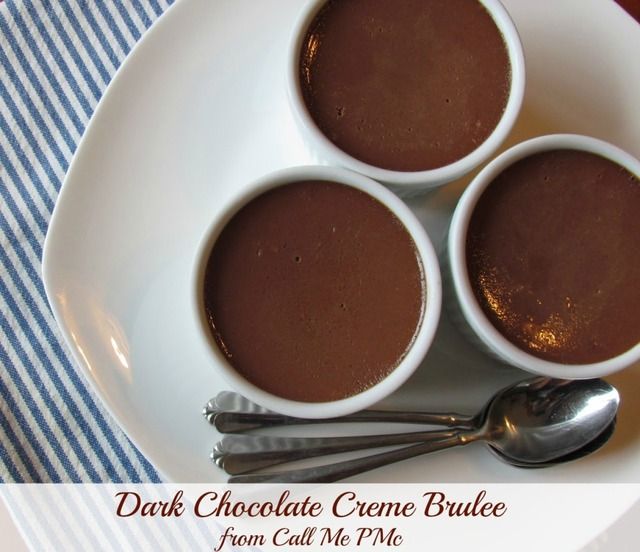
A big thank you to Nichi for allowing me to guest post today. I want to share the Dark Chocolate Creme Brulee with you. This would be a great ending to an elegant holiday dinner. It's my husband's absolute favorite dessert and he is not a big dessert eater! At first glance, it looks intimidating to make. Trust me, it's not, but your guests do not have to know, just let them think you slaved in the kitchen for hours for them!

Dark Chocolate Creme Brulee

Ingredients:
5 oz bittersweet chocolate, broken into pieces
2 c heavy cream
1/4 c milk
1 tsp expresso powder
6 egg yolks
Juice of 1 orange, about 1/4 cup
1/4 c sugar
1 tsp vanilla
6 T sugar and kitchen blowtorch if you plan to brulee top

Directions: 
1.  Preheat oven 325 degrees.
2.  Place ramekins in a 9x13 inch cake pan.
3.  Pour cream in a heavy sauce pan and heat to simmer. Add expresso and broken chocolate. Whisk and watch closely.
4.  Juice one orange, add vanilla and egg yolks; whisk all until well incorporated.
5.  Temper the egg mixture, then stir in to cream mixture. Whisk until everything is completely combined and smooth.
6.  Pour the custard into 6 ramekins (that you have place in a larger pan). Put in the oven then add water to the larger pan careful not to splash any in the chocolate mixture.
7.  Bake 30 to 35 minutes in 325 degree oven. Custards will be set around the edges and soft in the center, but the top will change from shiny to matte finish when the custards are cooked.
8.  Cool completely, then refrigerate, uncovered until cold.

*If you wish to brulee top, sprinkle sugar evenly over top. (It may help to pick up ramekin and swirl to evenly distribute sugar) Heat with a kitchen torch until caramelized. Brulee just before serving.

I would love for you to come visit and follow via Twitter, Facebook, or Pinterest!

Guest Post Spectacular - Guest #5 - Love Bakes Good Cakes


Hi y'all! I'm Jamie and I blog over at my little space on the web - Love Bakes Good Cakes. Don't let the name fool you - it's more than just cakes! I'm a Christian homeschooling mom with five kiddos. I enjoy trying new recipes and I'm always on the hunt for new ones! My family doesn't mind being guinea pigs for my kitchen experiments. I was thrilled when Nichi asked me if I'd be interested in stopping by to share at her place! Thank you so much, Nichi! :)

I'm not much of a cookie baker - except at Christmas time! I don't know what it is about the season that motivates me to actually want to bake cookies?! I am an equal opportunity cookie eater .... I don't discriminate and I don't have deep seeded trust issues from thinking raisins were chocolate chips .... Soft, chewy, crispy, fluffy, frosted, unfrosted, sprinkled or not - I love 'em all. However, I hate standing over them, waiting and watching .... switching out the batches every so many minutes. I hate to admit, but I don't have the patience. Patience is not one of my virtues. This time of year, it's easier to throw all of that impatience out the window and actually enjoy baking cookies.

When you have cookies as awesome as these Cranberry Orange Christmas Sandies, it's worth waiting and watching. Kids love them ... adults love them. They are very similar to Pecan Sandies - but get kicked up with some fruit and nonpareils. Wouldn't these look great on a Christmas cookie tray?! They are light and buttery, like a sandy should be - with a hint of fruitiness. They make great gifts for neighbors, teachers, co-workers ..... or just keep them all for yourself. No one will judge! ;)


Cranberry Orange Christmas Sandies
Printable recipe
Slightly adapted from BHG
Yield: 36 1-in. cookies
1 cup butter, softened
½ cup powdered sugar
1 tsp. vanilla
2 cups all-purpose flour
1 cup finely chopped dried cranberries
2 tsp. finely shredded orange peel
White, green and red nonpareils

Preheat oven to 350°F. Line cookie sheets with parchment paper and set aside. 

In a large bowl, beat the butter with an electric mixer on medium speed until fluffy. Add the powdered sugar. Mix with mixer until well combined, stopping the machine once to scrape the sides. Add vanilla and flour. Mix until well combined. Add the cranberries and orange peel. 

Shape dough into 1-in. balls and roll in nonpareils. Arrange 2 inches apart on the cookie sheet.

Bake for 15 minutes or until the bottoms are lightly browned. Immediately transfer from the pan to a cooling rack. Cool completely.

Note - To keep cookies fresh, store in a covered container. 


I hope you enjoy!

Thank you again for letting me share at Mandatory Mooch, Nichi! 

You can find me blogging at Love Bakes Good Cakes. If you are on social media - you can find me on Facebook, Twitter, Google+ and Pinterest.


Don't forget to like, share and comment ♥

signature

Guest Post Spectacular - Guest #4 - Mommy's Sweet Confessions


Hi Everyone!

My name is Lindsay and I am a mother to two boys 3 and under, and they keep me busy all day long.  In the very rare down time, I love to bake, cook, and blog about my culinary endeavors.  My blog, Mommy's Sweet Confessions, is where I chronicle all these cooking adventures, and I would love for you to visit, and make your acquaintance. You can also catch me on Facebook, Twitter, Pinterest, and Instagram. I would love to thank The Mandatory Mooch for inviting me to be part of her link party, it is an honor!!!

I have been on a quest to find eggnog goodies to make for my husband, because he loves eggnog.  This was my second attempt at it.  Thanks to Inside BruCrew Life's Eggnog Latte Cupcakes, I was able to give him a treat that made him go back for seconds!  I made very few changes to their recipe, because it was just so good to begin with, not much room for change.  They have a wonderful, subtle eggnog flavor in the cupcake, and the frosting has so much coffee deliciousness in it, my husband and I were eating it with a spoon.  Yep, that good!  Perfect combo for those that love their eggnog coffee drinks.


Caffè Eggnog Cupcakes

(Slightly adapted from Inside BruCrew Life's Eggnog Latte Cupcakes)


Makes 18-24 cupcakes, depending on how full they are filled

Ingredients
    For the Cupcakes
  • 1 vanilla cake mix
  • 3 eggs
  • 1 c. eggnog
  • 1/3 c. oil
  • 1/4 c. fat free Greek yogurt
  • 1 tsp. rum extract
  • 1 tsp. vanilla extract
  • 1/2 tsp. nutmeg
  • 1/2 tsp. ground cinnamon
    For the Coffee Cream Butter Cream 
  • 1/2 c. butter, softened
  • 4 oz. cream cheese, softened
  • 1 Tbsp. hot water
  • 2 Tbsp. instant coffee
  • 1/2 tsp. rum extract
  • pinch of salt
  • 4 c. powdered sugar
  • 1 Tbsp. eggnog
Instructions:
    For the Cupcakes
  1. Preheat oven to 350. Line pan with cupcake liners. Beat the cake mix, eggs, eggnog, oil, yogurt, extract, vanilla extract, cinnamon, and nutmeg on low for 1 minute and then on medium for 2 minutes. 
  2. Fill liners 2/3 of the way full. Bake 22 minutes, or until a toothpick inserted in the center comes out clean
  3. Cool on a wire rack completely before frosting with coffee buttercream. Dust with nutmeg. Keep cupcakes refrigerated. 
    For the Butter Cream 
  1. Dissolve the coffee in hot water and set aside. 
  2. Beat butter and cream cheese until fluffy. 
  3. Add coffee water, extract, and salt. Beat in sugar slowly. After all the sugar has been mixed in, beat in eggnog to thin it slightly. 
  4. Keep refrigerated.

Guest Post Spectacular - Guest #3 - allons-y kimberly

3 Ways to Refashion an Old Sweater by allons-y kimberly
Hello there! My name is Kimberly and I blog over at allons-y kimberly. I'm a young newlywed from Ohio with a love for God, cats, and everything geeky. My blog is a collection of things I find fun and interesting, from DIYs to Doctor Who, all mixed in with random excerpts from my wonderful life. My hair is constantly changing colors and I dream of someday running my own print shop/cupcake bakery. Until then, I just share my artwork, crafts, and recipes on my blog.
3 Ways to Refashion an Old Sweater by allons-y kimberly
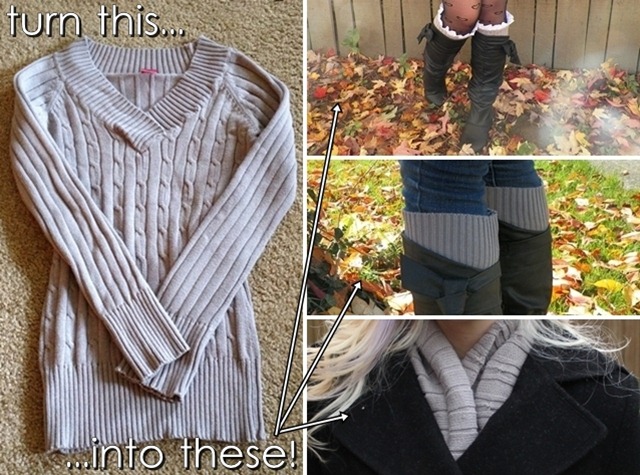
One of my favorite things to craft is clothing/accessories, especially when you can refashion pieces you already own. That's what I'm going to share with you today - how to turn an old sweater into THREE different pieces. It's getting chilly outside so you've probably started pulling all your winter clothes out from storage. Undoubtedly you've got at least one sweater you're not all that into anymore so why not cut it up and revamp it into some cute winter accessories? Here's how:
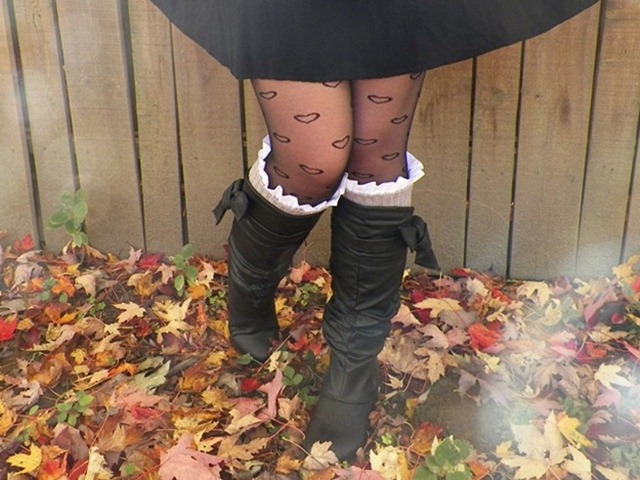
REFASHION #1: LEG WARMERS
3 Ways to Refashion an Old Sweater by allons-y kimberly
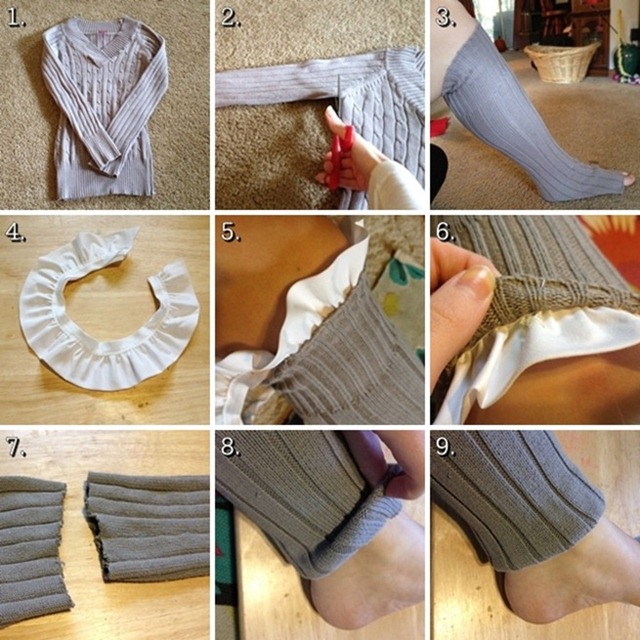
First, let's take the sleeves of an old sweater and turn them into leg warmers. Here's what you'll need:
SUPPLIES
  • old sweater (sleeves)
  • scissors
  • hot glue gun
  • ruffle ribbon (optional)
3 Ways to Refashion an Old Sweater by allons-y kimberly
1. get an old sweater // 2. cut the sleeves off // 3. roll the sleeve up onto your calf // 4. cut a strip of ruffles long enough to wrap around the top of your calf // 5. tuck the ribbon into the top of the sleeve around your knee - you need to be wearing it during this next step to make sure you keep the opening wide enough for your leg to fit through later // 6. hot glue the ribbon to the sleeve, or you can pin the ribbon in place and sew it if you prefer // 7. cut the bottom of the sleeve off about an inch past your foot // 8. fold the fabric over // 9. use a hot glue gun or needle and thread to hem the edge
3 Ways to Refashion an Old Sweater by allons-y kimberly

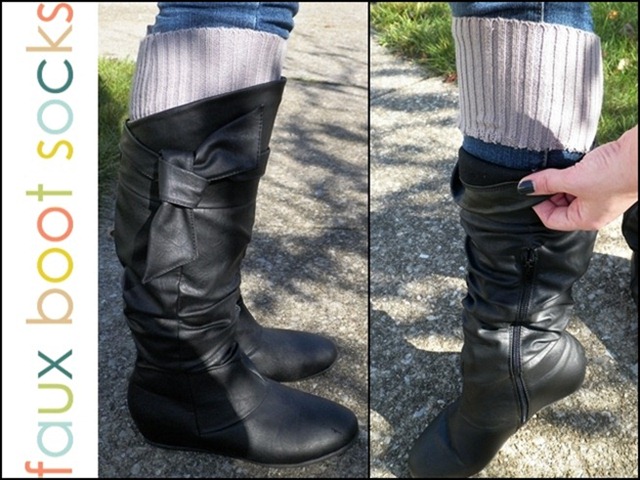
REFASHION #2: FAUX BOOT SOCKS
3 Ways to Refashion an Old Sweater by allons-y kimberly
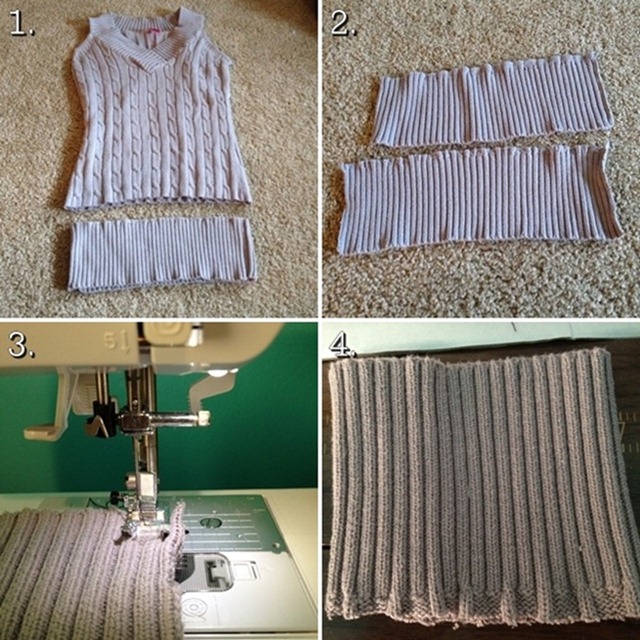
Next, we'll use the bottom band of the sweater to create faux boot socks. Here's what you'll need:
SUPPLIES:
  • old sweater (bottom band)
  • scissors
  • sewing machine/thread
3 Ways to Refashion an Old Sweater by allons-y kimberly
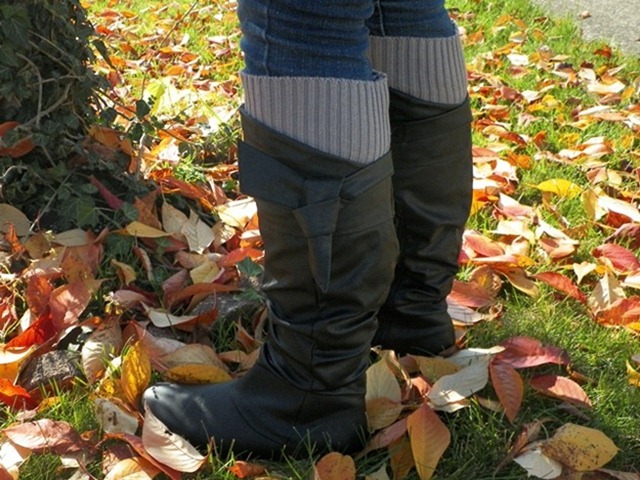
1. cut the bottom band off the sweater // 2. cut the band into two strips // 3. fold each strip over and sew a straight line connecting the ends (you could also hot glue the seem together if you don't feel like sewing) // 4. flip the sewn band right side out so the seam is hidden
3 Ways to Refashion an Old Sweater by allons-y kimberly
Then you just tuck it down into your boots. Simple as that.
3 Ways to Refashion an Old Sweater by allons-y kimberly

REFASHION #3: COWL NECK SCARF
3 Ways to Refashion an Old Sweater by allons-y kimberly
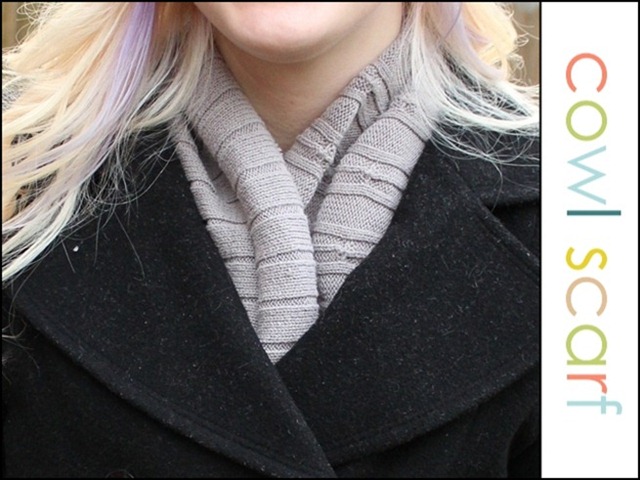
And third, we'll take the body of the sweater and turn it into a cowl neck scarf. Here's what you'll need:
SUPPLIES:
  • old sweater
  • scissors
Seriously that's all you need. Just cut off the top and bottom, so it's just a rectangle, and you're good to go! You can take the time to hem the edges if you want it to look extra nice, but I didn't bother - it's really easy to fold the edges over so they're hidden.
3 Ways to Refashion an Old Sweater by allons-y kimberly

Thanks so much for letting me guest post, Nichi! Hope you all enjoyed my tutorials and found them inspiring! Feel free to stop by my blog, send me a tweet, or follow my Pinterest boards!
Have a fantastic weekend!